> ## Documentation Index
> Fetch the complete documentation index at: https://www.pierview.ai/docs/llms.txt
> Use this file to discover all available pages before exploring further.
# Webflow CMS Integration
> Automatically publish AI-generated content to your Webflow CMS
## Overview
The Webflow CMS integration lets you publish SEO-optimized content directly to your Webflow site's CMS collection, as a draft or live, straight from Pierview. Set up your connection once, then export any generated article with a single click.
When you map the **Content** field, you choose one of two approaches: **Rich Text** (recommended, zero template changes) or **Article HTML** (advanced, full table rendering). [Step 3](#step-3-choose-how-to-publish-content) walks through both so you can pick the right one.
## Step 1: Generate a Webflow Site API Token
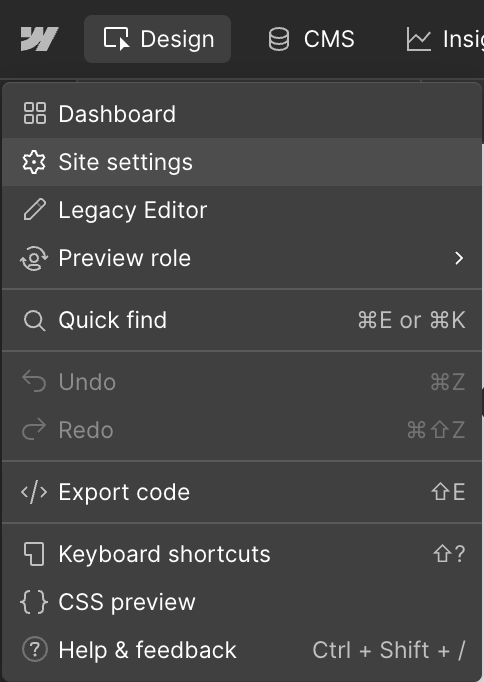
1. In Webflow, open your site, click the **Webflow icon** in the top-left, then choose **Site settings** from the dropdown.
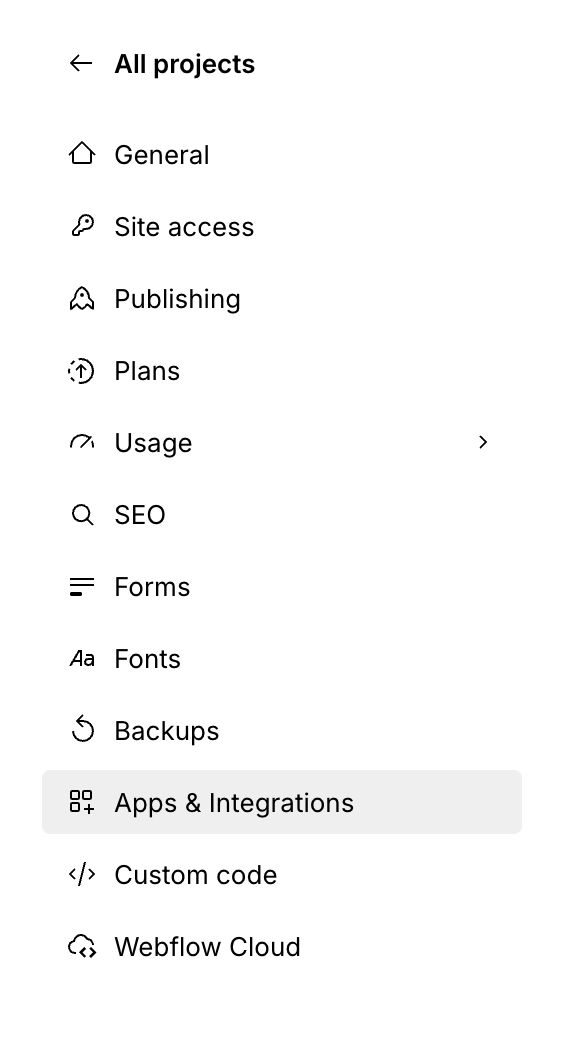
 2. In the settings sidebar, click **Apps & integrations**.
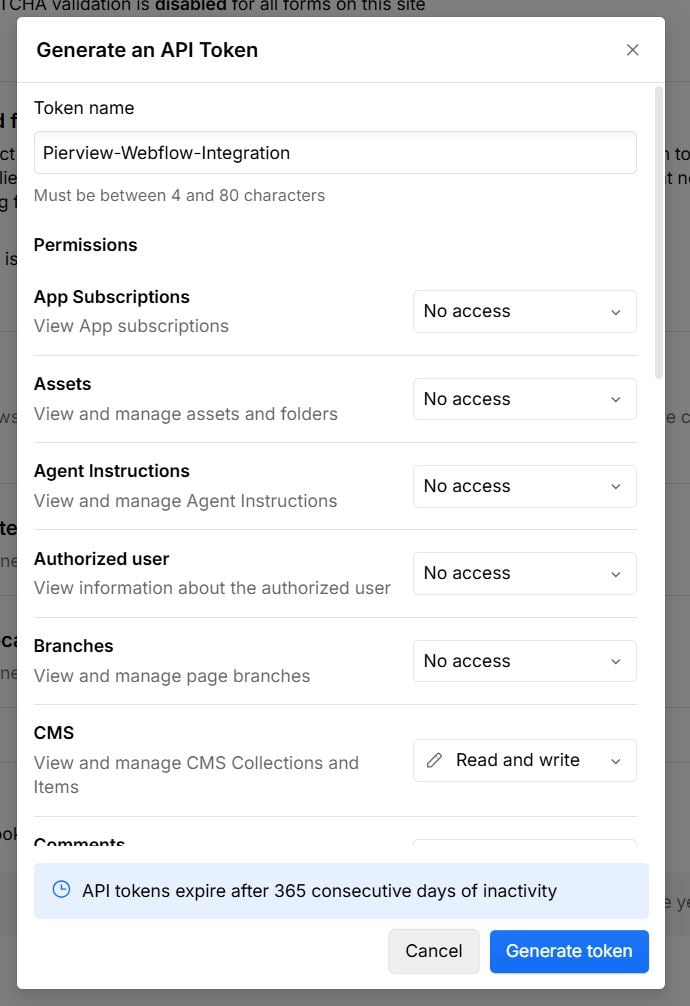
 3. Scroll to the **API access** section and click **Generate API token**.
 4. Name it `Pierview`, and grant these scopes:
* **CMS**: Read and write (`cms:read`, `cms:write`)
* **Sites**: Read (`sites:read`)
5. Copy the token.
4. Name it `Pierview`, and grant these scopes:
* **CMS**: Read and write (`cms:read`, `cms:write`)
* **Sites**: Read (`sites:read`)
5. Copy the token.
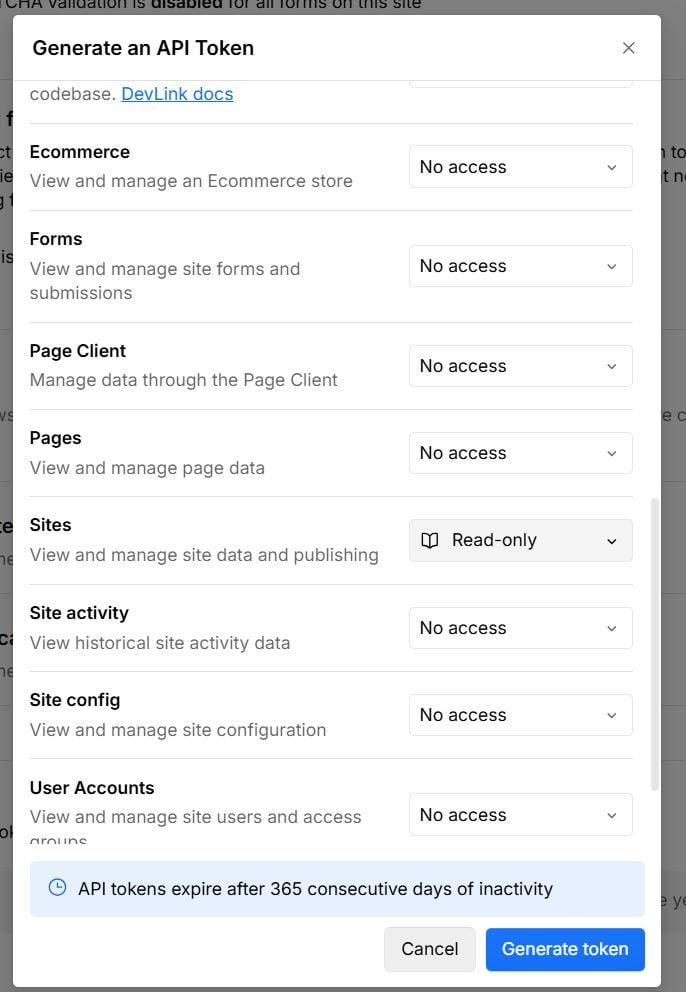 Keep the token dialog open until you've pasted it into Pierview. Webflow only shows the token once.
## Step 2: Connect Pierview to Webflow
1. In Pierview, go to [Settings → Integrations → CMS Integrations](https://pierview.ai/dashboard/configuration/integrations) and click **Connect** next to Webflow.
Keep the token dialog open until you've pasted it into Pierview. Webflow only shows the token once.
## Step 2: Connect Pierview to Webflow
1. In Pierview, go to [Settings → Integrations → CMS Integrations](https://pierview.ai/dashboard/configuration/integrations) and click **Connect** next to Webflow.
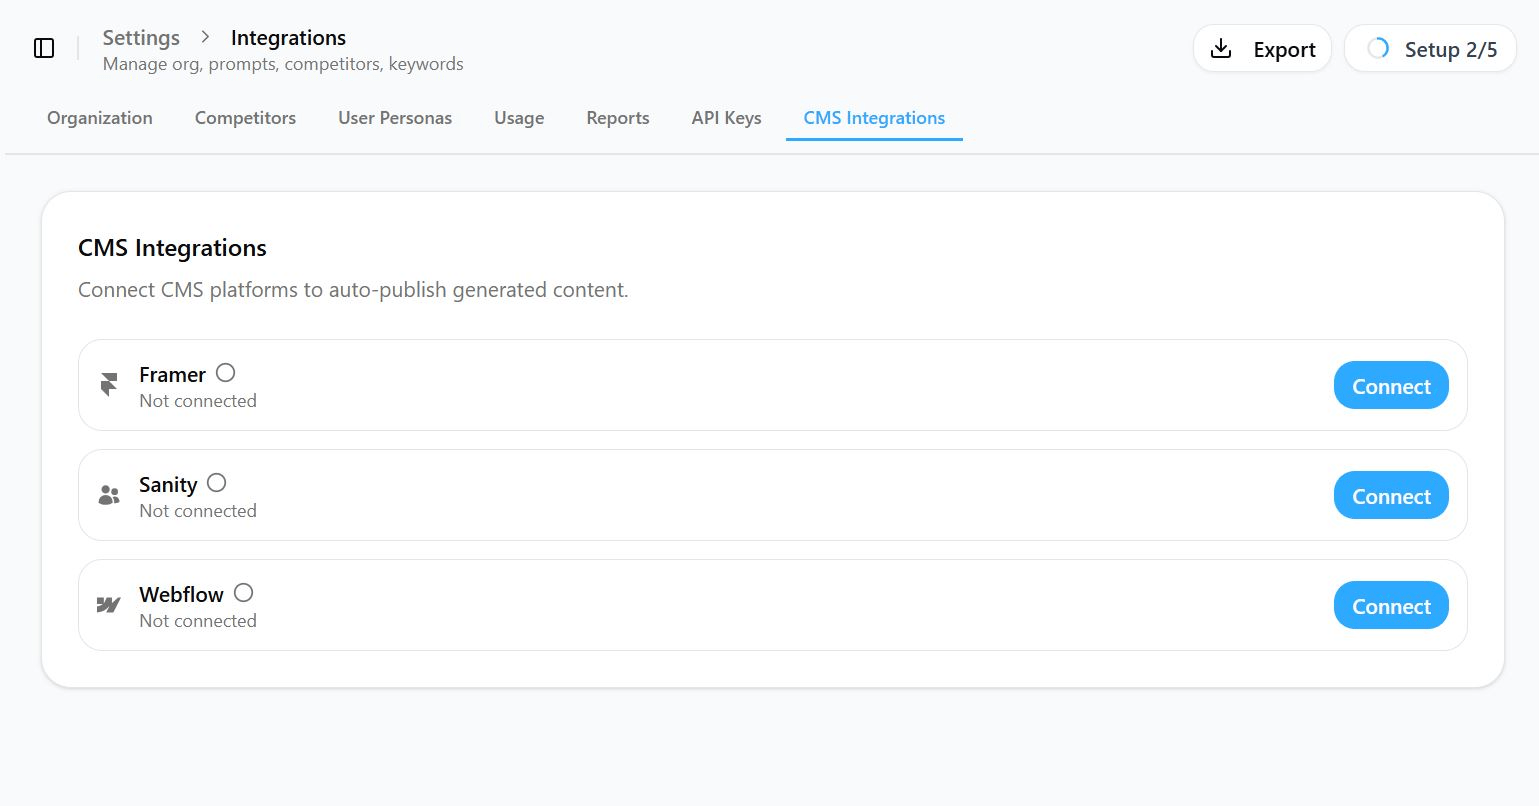 2. **Paste your Site API token**, then click **Fetch Sites** and pick your site.
3. Select the **CMS collection** where content should be published (e.g. "Blog Posts").
4. Map the fields:
* **Title → `Name`** (the collection's name field)
* **Slug → `Slug`**
* **Content → choose Rich Text or Article HTML** (see [Step 3](#step-3-choose-how-to-publish-content))
## Step 3: Choose how to publish Content
Pierview gives you two ways to map the **Content** field. Pick based on whether you need tables to render automatically.
**Already have blog posts? Use Rich Text.** It publishes into your existing Rich Text field (e.g. `Post Body`), so old and new posts share the same template with **zero changes and full backward compatibility**. No conditional visibility, no template surgery.
| | **Rich Text** (recommended) | **Article HTML** (advanced) |
| ---------------------------------- | ----------------------------- | ---------------------------- |
| Setup time | None | \~5 minutes, one-time |
| Template changes | None | Add a Code Embed |
| Tables | Stripped, copy/embed manually | Render automatically |
| Backward compatible with old posts | Yes, same field | Needs conditional visibility |
### Option A: Rich Text (recommended, simplest)
Map **Content → your Rich Text field** (e.g. `Post Body`). When Pierview detects a Rich Text field in your collection, it selects this for you automatically.
* Works with your existing blog template as-is, with no Webflow Designer changes.
* Existing posts keep rendering exactly as before, since Pierview writes to the same field they already use.
* Headings, paragraphs, bold, italics, lists, links, and images all render natively.
The one limitation: Webflow's Rich Text field strips tables. If an article contains a table, embed it manually with the steps below.
#### Adding a table in Rich Text
Pierview publishes everything except tables into the Rich Text field. To place a table, copy it from Pierview and drop it into an HTML embed block inside Rich Text:
1. In Pierview's content editor, hover the table and click the **copy button**, then choose **Copy as HTML**.
2. In Webflow, open the post and click into the **Post Body** Rich Text field at the spot where the table should appear.
2. **Paste your Site API token**, then click **Fetch Sites** and pick your site.
3. Select the **CMS collection** where content should be published (e.g. "Blog Posts").
4. Map the fields:
* **Title → `Name`** (the collection's name field)
* **Slug → `Slug`**
* **Content → choose Rich Text or Article HTML** (see [Step 3](#step-3-choose-how-to-publish-content))
## Step 3: Choose how to publish Content
Pierview gives you two ways to map the **Content** field. Pick based on whether you need tables to render automatically.
**Already have blog posts? Use Rich Text.** It publishes into your existing Rich Text field (e.g. `Post Body`), so old and new posts share the same template with **zero changes and full backward compatibility**. No conditional visibility, no template surgery.
| | **Rich Text** (recommended) | **Article HTML** (advanced) |
| ---------------------------------- | ----------------------------- | ---------------------------- |
| Setup time | None | \~5 minutes, one-time |
| Template changes | None | Add a Code Embed |
| Tables | Stripped, copy/embed manually | Render automatically |
| Backward compatible with old posts | Yes, same field | Needs conditional visibility |
### Option A: Rich Text (recommended, simplest)
Map **Content → your Rich Text field** (e.g. `Post Body`). When Pierview detects a Rich Text field in your collection, it selects this for you automatically.
* Works with your existing blog template as-is, with no Webflow Designer changes.
* Existing posts keep rendering exactly as before, since Pierview writes to the same field they already use.
* Headings, paragraphs, bold, italics, lists, links, and images all render natively.
The one limitation: Webflow's Rich Text field strips tables. If an article contains a table, embed it manually with the steps below.
#### Adding a table in Rich Text
Pierview publishes everything except tables into the Rich Text field. To place a table, copy it from Pierview and drop it into an HTML embed block inside Rich Text:
1. In Pierview's content editor, hover the table and click the **copy button**, then choose **Copy as HTML**.
2. In Webflow, open the post and click into the **Post Body** Rich Text field at the spot where the table should appear.
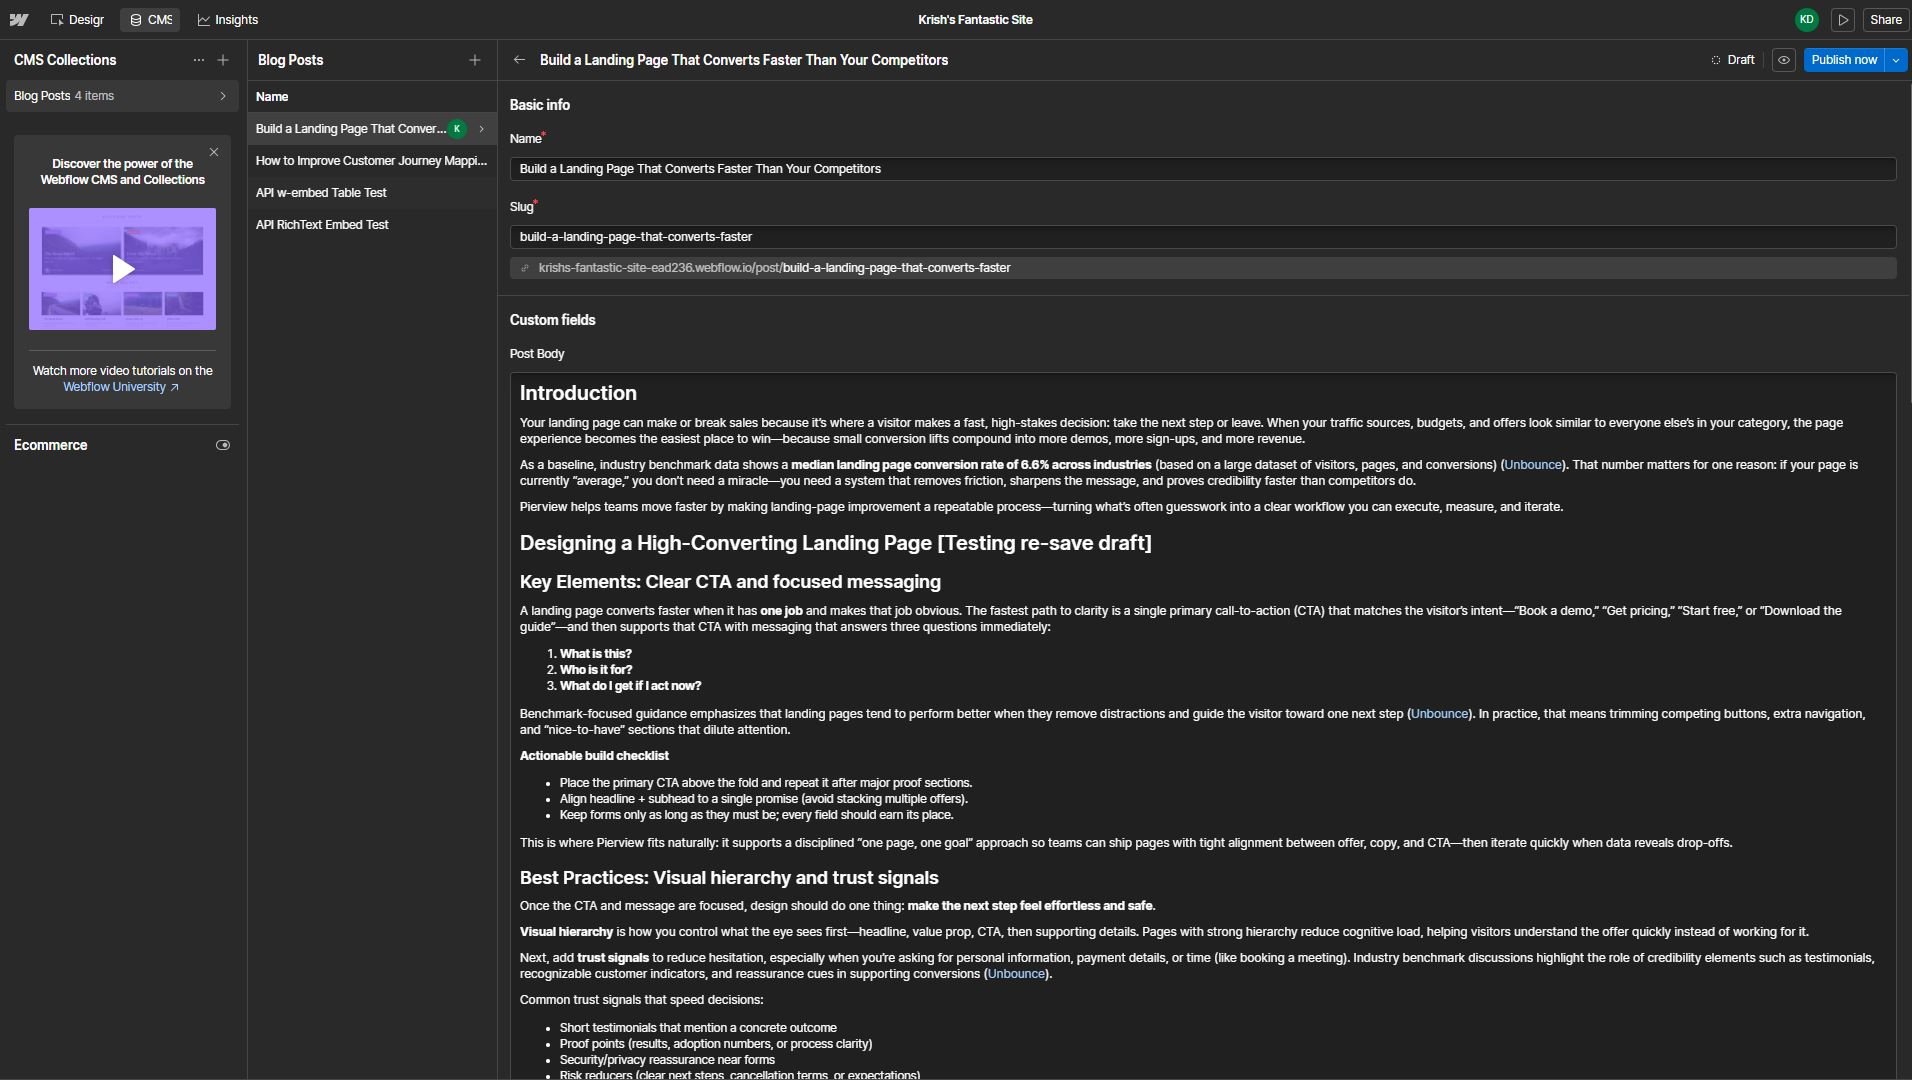 3. Click the **`+`** (add block) button and choose **HTML embed**.
4. Paste the copied HTML and apply. The table now renders inline with the rest of the article.
3. Click the **`+`** (add block) button and choose **HTML embed**.
4. Paste the copied HTML and apply. The table now renders inline with the rest of the article.
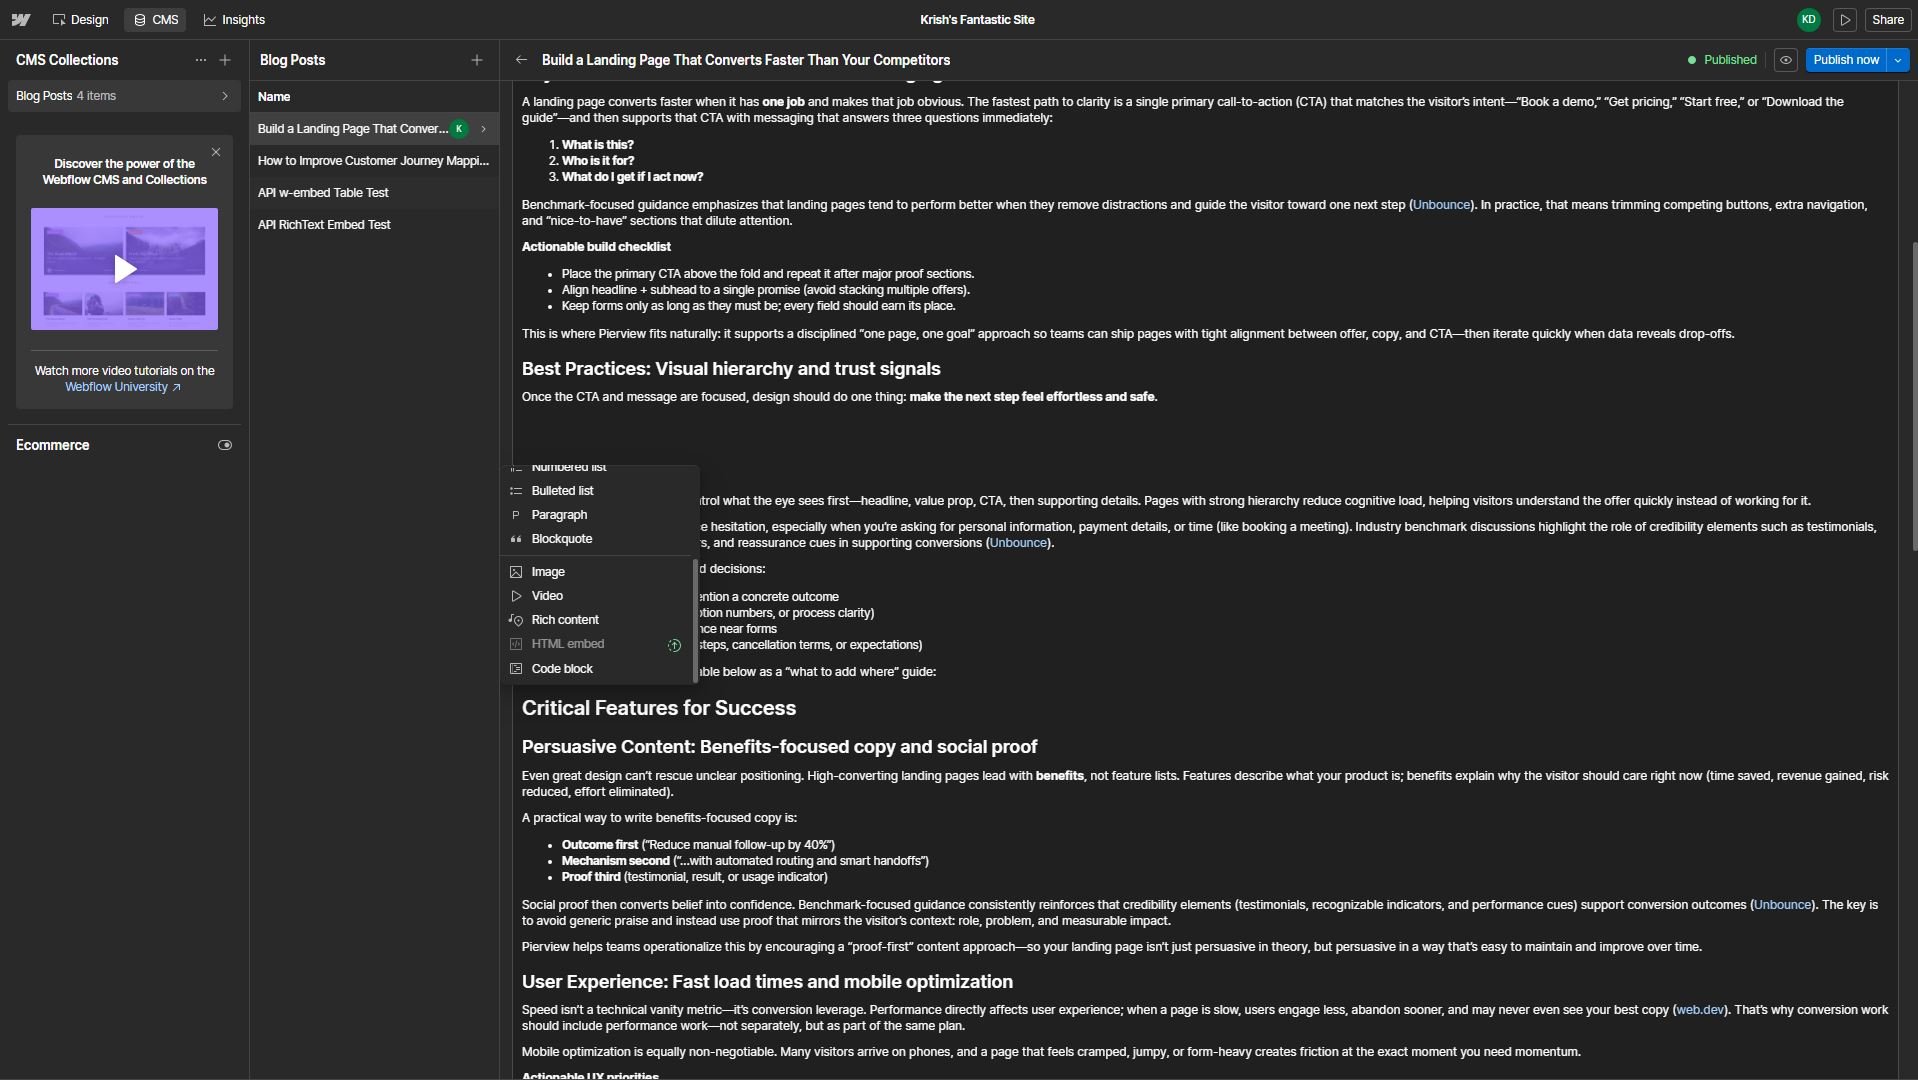 That's it for Rich Text. No template setup needed, so skip ahead to [You're Connected](#you're-connected) and start publishing.
### Option B: Article HTML (advanced, full table support)
Choose this **only if you need tables to render automatically** without any manual steps. Webflow's built-in **Rich Text** field strips tables out, so Pierview writes the article as HTML into a **Plain Text** field instead, which you display using a **Custom Code Embed** in your blog template. This setup takes about 5 minutes and only needs to be done once.
In the field mapping, set **Content → your "Article HTML" field** (you'll create it next).
### a. Add the field in your collection
1. In Webflow, open your **CMS collection** (e.g. "Blog Posts"), where you'll see your existing fields listed.
That's it for Rich Text. No template setup needed, so skip ahead to [You're Connected](#you're-connected) and start publishing.
### Option B: Article HTML (advanced, full table support)
Choose this **only if you need tables to render automatically** without any manual steps. Webflow's built-in **Rich Text** field strips tables out, so Pierview writes the article as HTML into a **Plain Text** field instead, which you display using a **Custom Code Embed** in your blog template. This setup takes about 5 minutes and only needs to be done once.
In the field mapping, set **Content → your "Article HTML" field** (you'll create it next).
### a. Add the field in your collection
1. In Webflow, open your **CMS collection** (e.g. "Blog Posts"), where you'll see your existing fields listed.
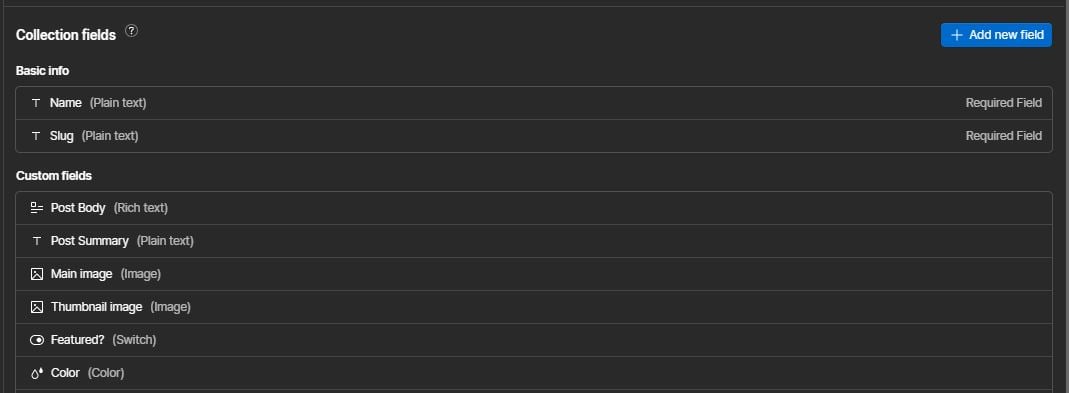 2. Click **+ Add new field**, choose **Plain Text**, name it **Article HTML**, and set its text type to **Multiple lines (long text)**.
3. Click **Save Field**.
2. Click **+ Add new field**, choose **Plain Text**, name it **Article HTML**, and set its text type to **Multiple lines (long text)**.
3. Click **Save Field**.
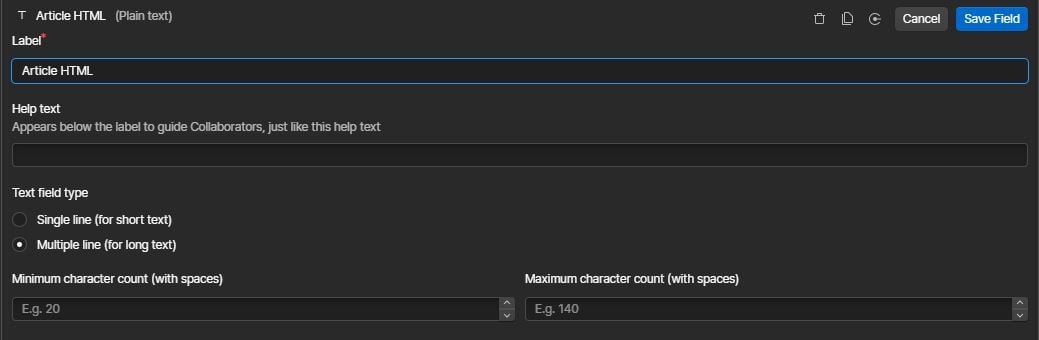 The field **must** be set to multiple lines. A single-line Plain Text field will save drafts fine but fail on live publish with "Expected value to be a single line" because the article HTML contains line breaks.
### b. Add a Code Embed to your blog template
1. Open your **blog post template page** in the Webflow Designer.
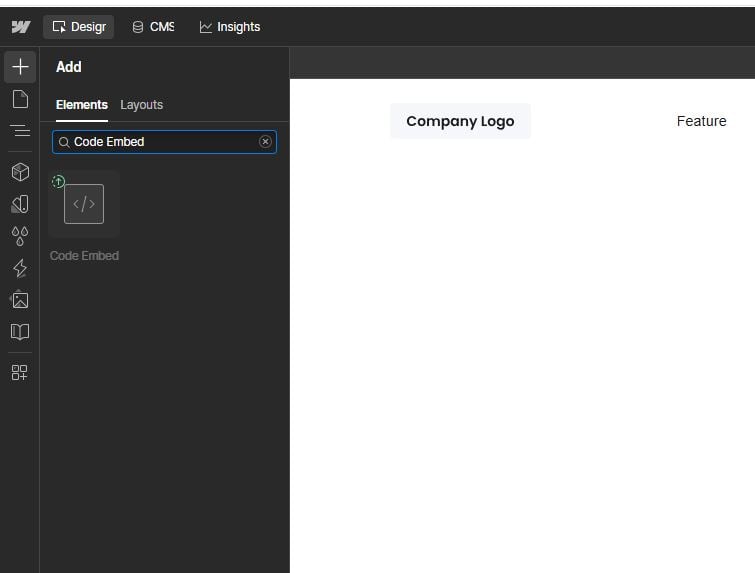
2. In the **Add panel** (left sidebar), go to **Components → Embed** and drag it onto the page where you want the article body to appear.
3. Inside the Embed settings, click **+ Add field** and choose your **Article HTML** field to bind it.
The field **must** be set to multiple lines. A single-line Plain Text field will save drafts fine but fail on live publish with "Expected value to be a single line" because the article HTML contains line breaks.
### b. Add a Code Embed to your blog template
1. Open your **blog post template page** in the Webflow Designer.
2. In the **Add panel** (left sidebar), go to **Components → Embed** and drag it onto the page where you want the article body to appear.
3. Inside the Embed settings, click **+ Add field** and choose your **Article HTML** field to bind it.
 ### c. Already have blog posts? Set up conditional visibility
If your site already has blog posts using a **Rich Text** field (e.g. `Post Body`), you need to tell Webflow when to show each element, otherwise old posts will show an empty embed and new posts will show an empty Rich Text block.
Pierview writes to the new **Article HTML** field and never touches your existing `Post Body` field, so your old content is completely safe. You just need to add a visibility rule to each element on the template page:
1. Select your **Rich Text element** → go to **Settings panel → Conditional Visibility** → set it to show only **when `Post Body` is set**.
2. Select your **Code Embed element** → same panel → show only **when `Article HTML` is set**.
Old posts will render via Rich Text as before, Pierview posts will render via the Embed, and neither shows an empty gap.
No existing blogs? Skip this step, it only applies if you already have posts in your collection using a Rich Text field.
### d. Match your brand's table styles (optional)
This step applies to the **Article HTML** approach only. (With Rich Text, content inherits your site's styles automatically, so there's nothing to configure here.)
Pierview ships sensible default table styles, but you can override them to match your site. Because all Pierview content is wrapped in `.pv-content`, one CSS block controls everything.
In **Webflow Designer → Site Settings → Custom Code → Head Code**, add:
```css theme={null}
```
Everything else (headings, paragraphs, bold, lists) inherits your site's existing typography automatically.
Pierview wraps every article in a `.pv-content` container and includes default table styling, so tables look clean out of the box.
Finally, **publish your Webflow site** so the new field and embed go live.
## You're Connected!
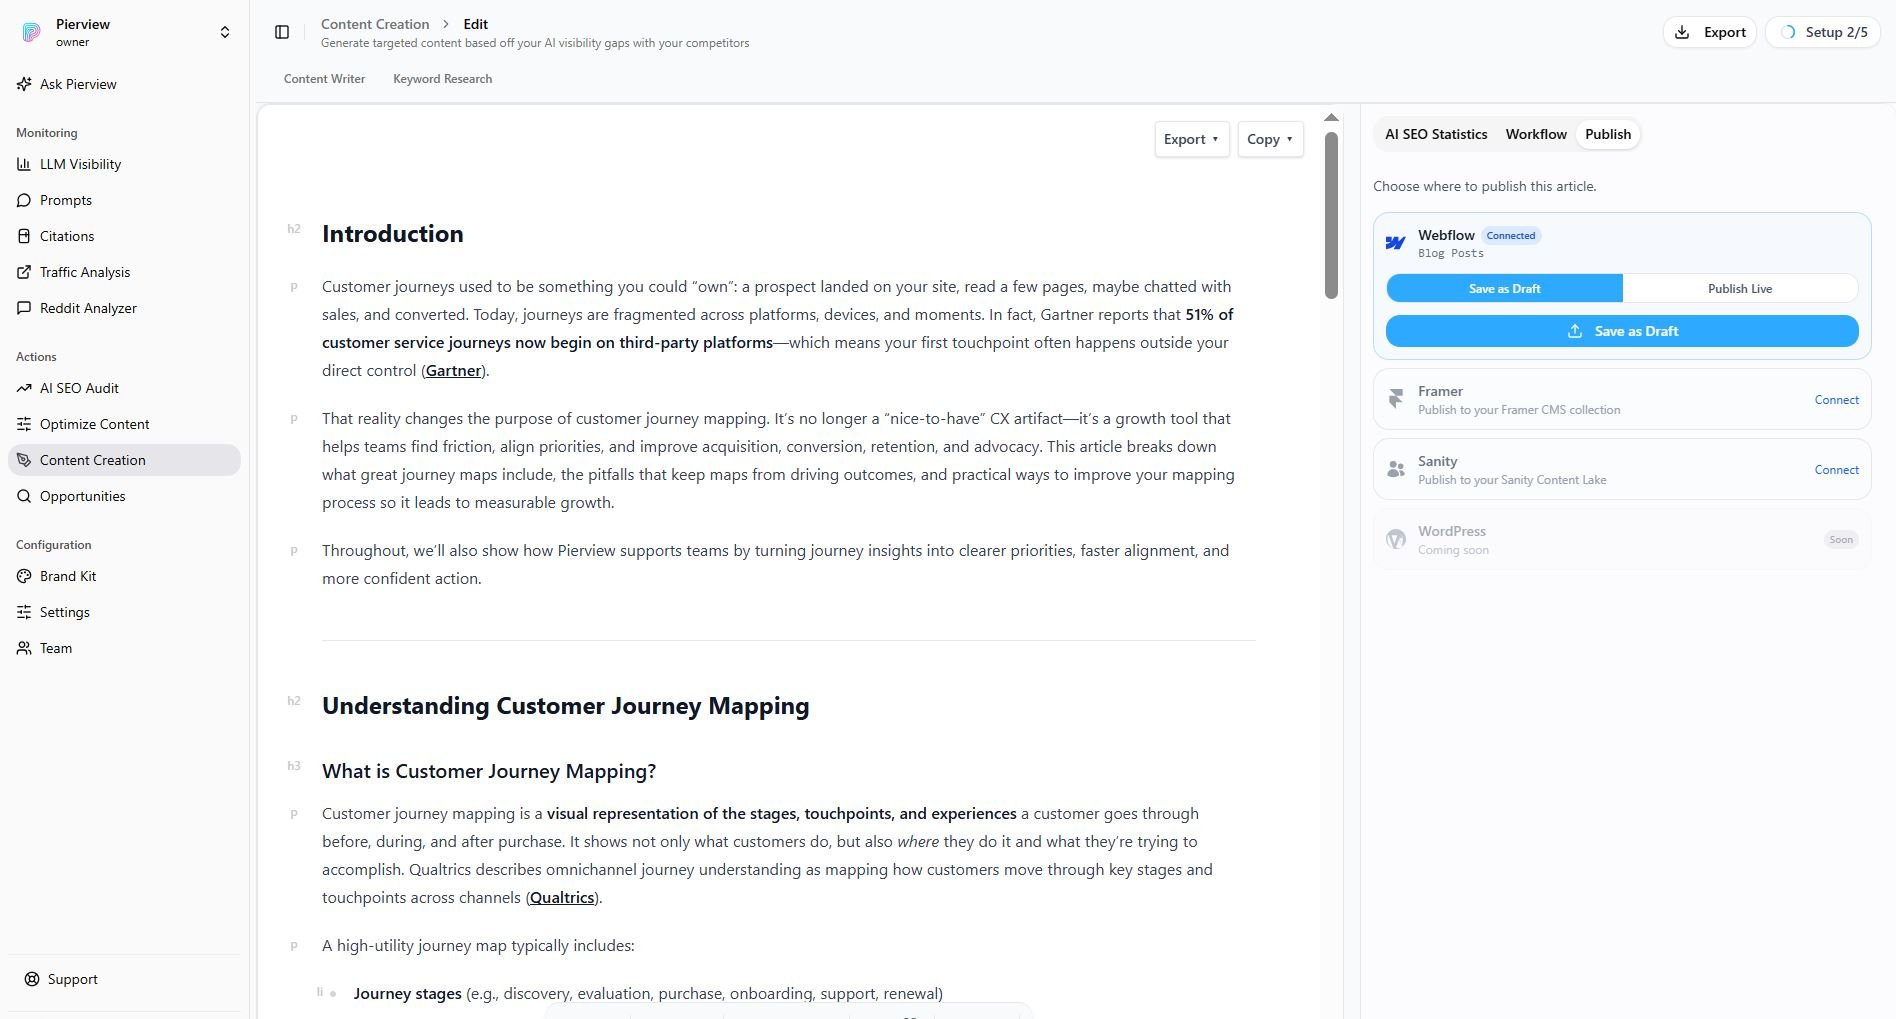
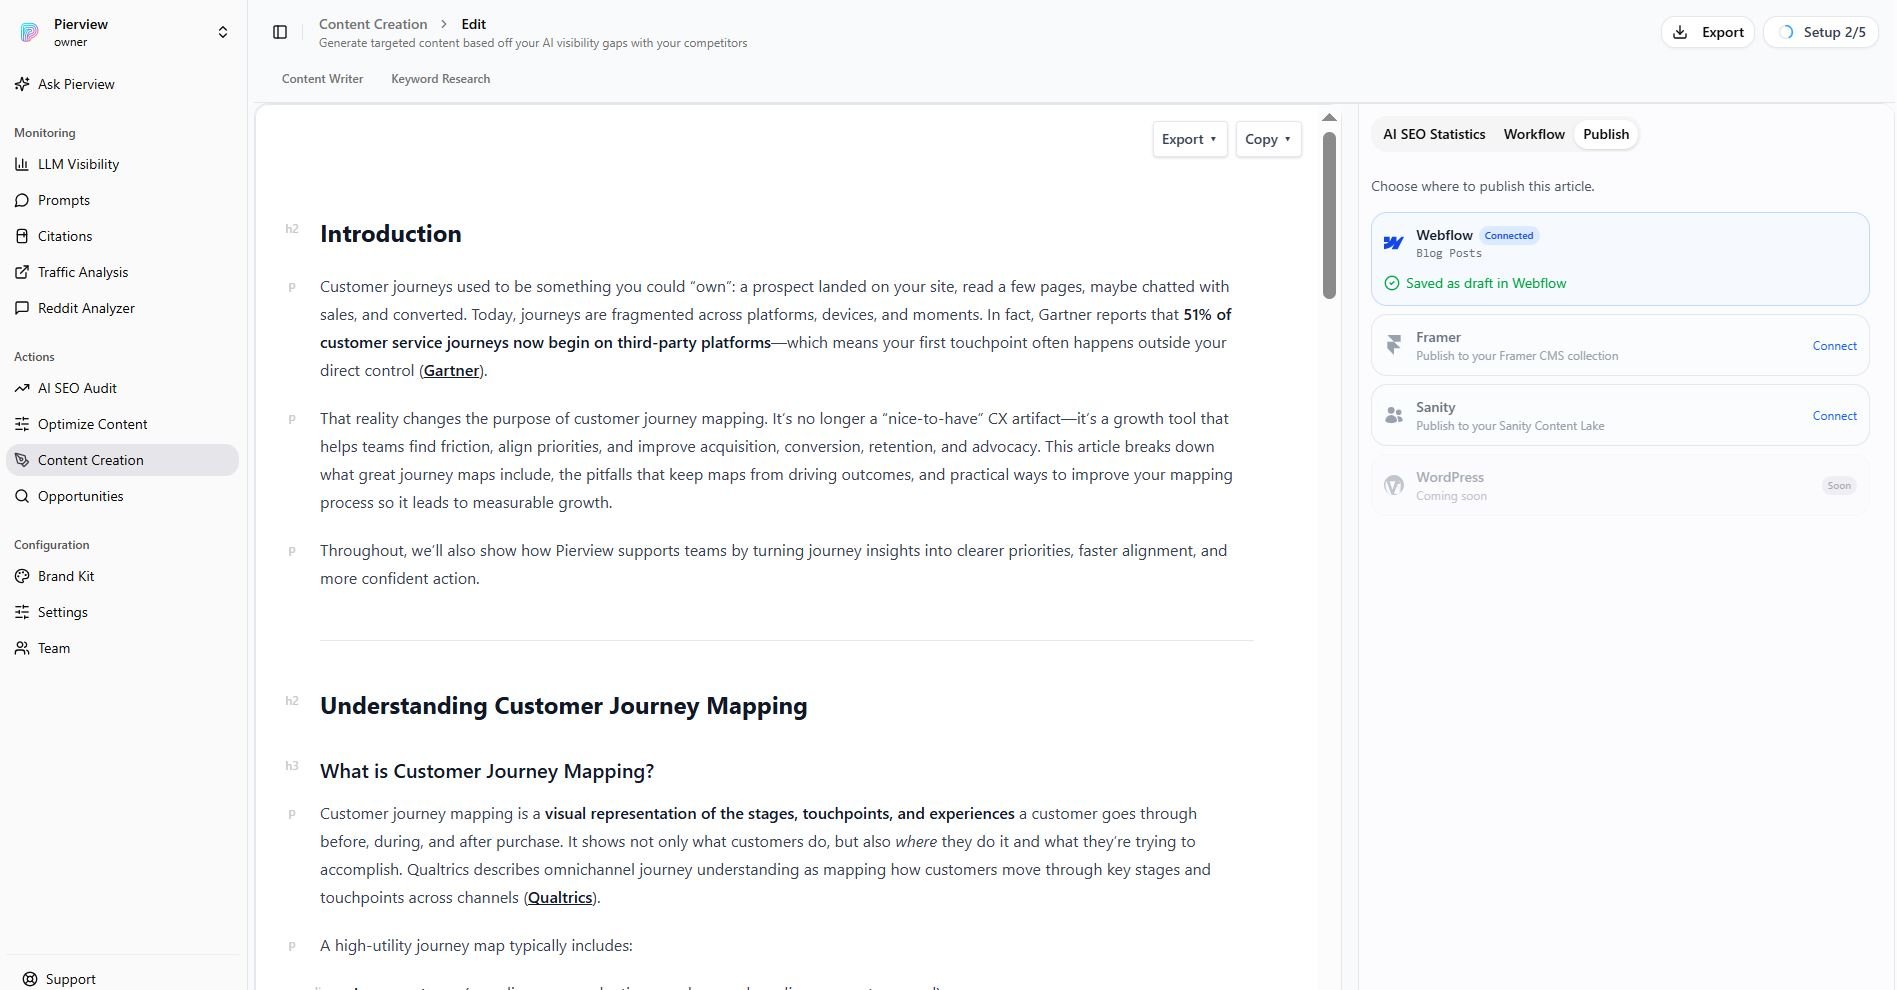
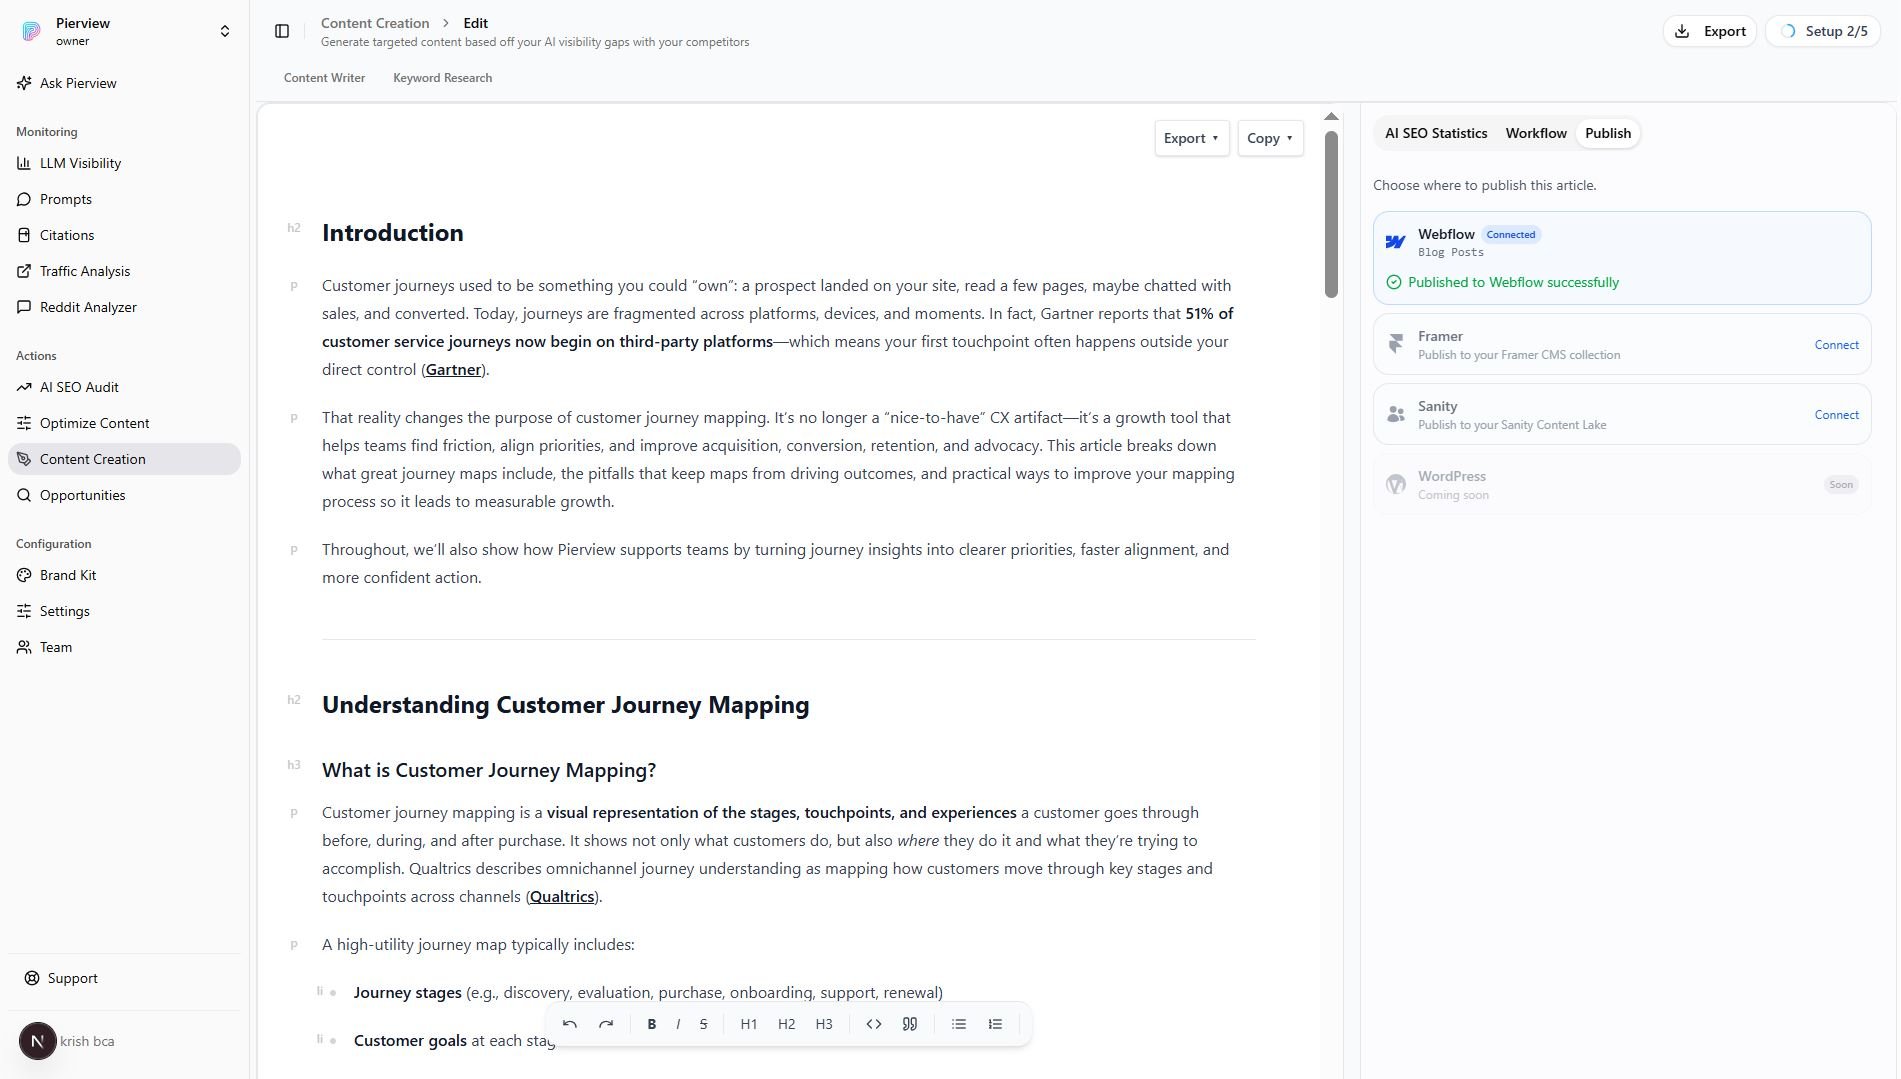
Open any content generation and click **Publish** in the top-right sidebar. Choose **Save as Draft** (staged in Webflow, not visible to visitors yet) or **Publish Live** to make it live. Re-publishing the same article updates the existing item, so it will never create a duplicate.
### c. Already have blog posts? Set up conditional visibility
If your site already has blog posts using a **Rich Text** field (e.g. `Post Body`), you need to tell Webflow when to show each element, otherwise old posts will show an empty embed and new posts will show an empty Rich Text block.
Pierview writes to the new **Article HTML** field and never touches your existing `Post Body` field, so your old content is completely safe. You just need to add a visibility rule to each element on the template page:
1. Select your **Rich Text element** → go to **Settings panel → Conditional Visibility** → set it to show only **when `Post Body` is set**.
2. Select your **Code Embed element** → same panel → show only **when `Article HTML` is set**.
Old posts will render via Rich Text as before, Pierview posts will render via the Embed, and neither shows an empty gap.
No existing blogs? Skip this step, it only applies if you already have posts in your collection using a Rich Text field.
### d. Match your brand's table styles (optional)
This step applies to the **Article HTML** approach only. (With Rich Text, content inherits your site's styles automatically, so there's nothing to configure here.)
Pierview ships sensible default table styles, but you can override them to match your site. Because all Pierview content is wrapped in `.pv-content`, one CSS block controls everything.
In **Webflow Designer → Site Settings → Custom Code → Head Code**, add:
```css theme={null}
```
Everything else (headings, paragraphs, bold, lists) inherits your site's existing typography automatically.
Pierview wraps every article in a `.pv-content` container and includes default table styling, so tables look clean out of the box.
Finally, **publish your Webflow site** so the new field and embed go live.
## You're Connected!
Open any content generation and click **Publish** in the top-right sidebar. Choose **Save as Draft** (staged in Webflow, not visible to visitors yet) or **Publish Live** to make it live. Re-publishing the same article updates the existing item, so it will never create a duplicate.
 ## Troubleshooting
Webflow can only create live items on a site that has been published at least once. Click the **Publish** button in Webflow, then try publishing live again from Pierview. Saving as a draft always works, even before the first publish.
This depends on which Content mapping you chose:
* **Rich Text**: tables are stripped by Webflow, this is expected. Use the **copy button** on each table in the Pierview content editor to embed it manually. Everything else renders normally.
* **Article HTML**: make sure you mapped **Content** to the **Article HTML** Plain Text field (not a Rich Text field), and that your blog template has a **Code Embed** bound to that field ([Step 3, b](#b-add-a-code-embed-to-your-blog-template)). If content shows as raw HTML, the Code Embed binding is missing.
* Verify your API token is correct and has `cms:read`, `cms:write`, and `sites:read` scopes
* Confirm the correct site and collection are selected in Pierview settings
* Check that the integration is enabled (toggle is on)
* For live publishing, ensure the site has been published at least once in Webflow
**Easiest option: use Rich Text.** Map **Content** to the same Rich Text field your existing posts already use (e.g. `Post Body`). New Pierview posts then render through your current template with no changes and no conditional visibility, old and new posts behave identically. The only trade-off is that tables are copied/embedded manually via the per-table copy button. **This is what Pierview recommends.**
If you specifically need tables to render automatically, you can use the **Article HTML** approach instead. Because Pierview then writes to a separate **Article HTML** field, you add a **conditional visibility** rule to each element (select the element → **Settings panel → Conditional Visibility**):
* **Rich Text element** → show only **when `Post Body` is set**
* **Code Embed element** → show only **when `Article HTML` is set**
Old posts render via Rich Text, Pierview posts render via the Embed, and neither shows an empty gap.
This applies to the **Article HTML** approach. Follow [Step 3, d](#d-match-your-brands-table-styles-optional) to add your own `.pv-content` CSS overrides in Webflow's Custom Code settings. This controls border colors, header backgrounds, and spacing to match your design exactly.
This only happens with the **Article HTML** approach: because the article body lives inside a Code Embed, it isn't directly editable in Webflow Designer. Make your changes in Pierview and re-publish, and the Webflow item updates automatically.
If you'd rather edit content the normal way, switch **Content** to a **Rich Text** field. There's no setup, the body stays editable in Webflow, and you only need the per-table copy button to embed any tables manually. Pierview recommends Rich Text for this reason.
## Troubleshooting
Webflow can only create live items on a site that has been published at least once. Click the **Publish** button in Webflow, then try publishing live again from Pierview. Saving as a draft always works, even before the first publish.
This depends on which Content mapping you chose:
* **Rich Text**: tables are stripped by Webflow, this is expected. Use the **copy button** on each table in the Pierview content editor to embed it manually. Everything else renders normally.
* **Article HTML**: make sure you mapped **Content** to the **Article HTML** Plain Text field (not a Rich Text field), and that your blog template has a **Code Embed** bound to that field ([Step 3, b](#b-add-a-code-embed-to-your-blog-template)). If content shows as raw HTML, the Code Embed binding is missing.
* Verify your API token is correct and has `cms:read`, `cms:write`, and `sites:read` scopes
* Confirm the correct site and collection are selected in Pierview settings
* Check that the integration is enabled (toggle is on)
* For live publishing, ensure the site has been published at least once in Webflow
**Easiest option: use Rich Text.** Map **Content** to the same Rich Text field your existing posts already use (e.g. `Post Body`). New Pierview posts then render through your current template with no changes and no conditional visibility, old and new posts behave identically. The only trade-off is that tables are copied/embedded manually via the per-table copy button. **This is what Pierview recommends.**
If you specifically need tables to render automatically, you can use the **Article HTML** approach instead. Because Pierview then writes to a separate **Article HTML** field, you add a **conditional visibility** rule to each element (select the element → **Settings panel → Conditional Visibility**):
* **Rich Text element** → show only **when `Post Body` is set**
* **Code Embed element** → show only **when `Article HTML` is set**
Old posts render via Rich Text, Pierview posts render via the Embed, and neither shows an empty gap.
This applies to the **Article HTML** approach. Follow [Step 3, d](#d-match-your-brands-table-styles-optional) to add your own `.pv-content` CSS overrides in Webflow's Custom Code settings. This controls border colors, header backgrounds, and spacing to match your design exactly.
This only happens with the **Article HTML** approach: because the article body lives inside a Code Embed, it isn't directly editable in Webflow Designer. Make your changes in Pierview and re-publish, and the Webflow item updates automatically.
If you'd rather edit content the normal way, switch **Content** to a **Rich Text** field. There's no setup, the body stays editable in Webflow, and you only need the per-table copy button to embed any tables manually. Pierview recommends Rich Text for this reason.