> ## Documentation Index
> Fetch the complete documentation index at: https://www.pierview.ai/docs/llms.txt
> Use this file to discover all available pages before exploring further.
# Connect Mintlify Docs
> Ground AI-generated content in your own product documentation using an MCP source
## Overview
MCP Sources let you connect an MCP-compatible source, such as your **Mintlify docs**, so Pierview can query it before writing content. The AI uses your documentation to ground articles in accurate product details: features, terminology, and how things actually work. This means generated content references your real product instead of guessing.
Your MCP server must be **publicly accessible with no authentication
required**. Pierview queries the endpoint without credentials, so a private or
auth-gated server cannot be used.
## Step 1: Open the Documents page
In Pierview, go to [Brand Kit → Documents](https://pierview.ai/dashboard/brand-kit/documents).
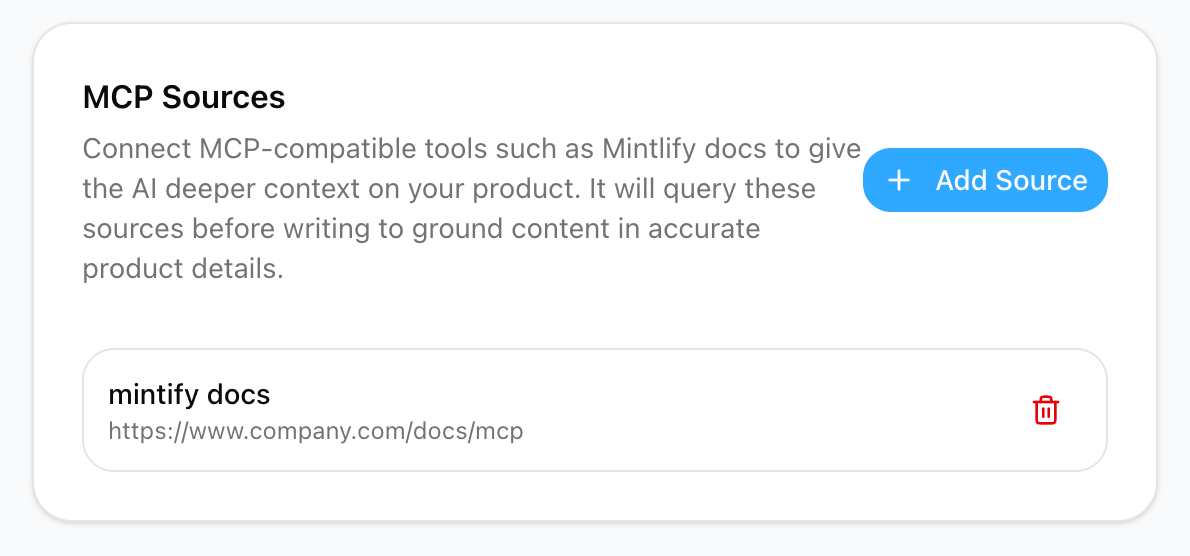
Find the **MCP Sources** card and click **Add Source**.
 ## Step 2: Add your MCP server
In the dialog, enter:
| Field | What to enter |
| -------------------- | ---------------------------------------------------------------------------------- |
| **Name** | A label for the source (e.g. `Mintlify Docs`) |
| **MCP Endpoint URL** | The full URL of your public MCP server (e.g. `https://your-docs.mintlify.app/mcp`) |
## Step 2: Add your MCP server
In the dialog, enter:
| Field | What to enter |
| -------------------- | ---------------------------------------------------------------------------------- |
| **Name** | A label for the source (e.g. `Mintlify Docs`) |
| **MCP Endpoint URL** | The full URL of your public MCP server (e.g. `https://your-docs.mintlify.app/mcp`) |
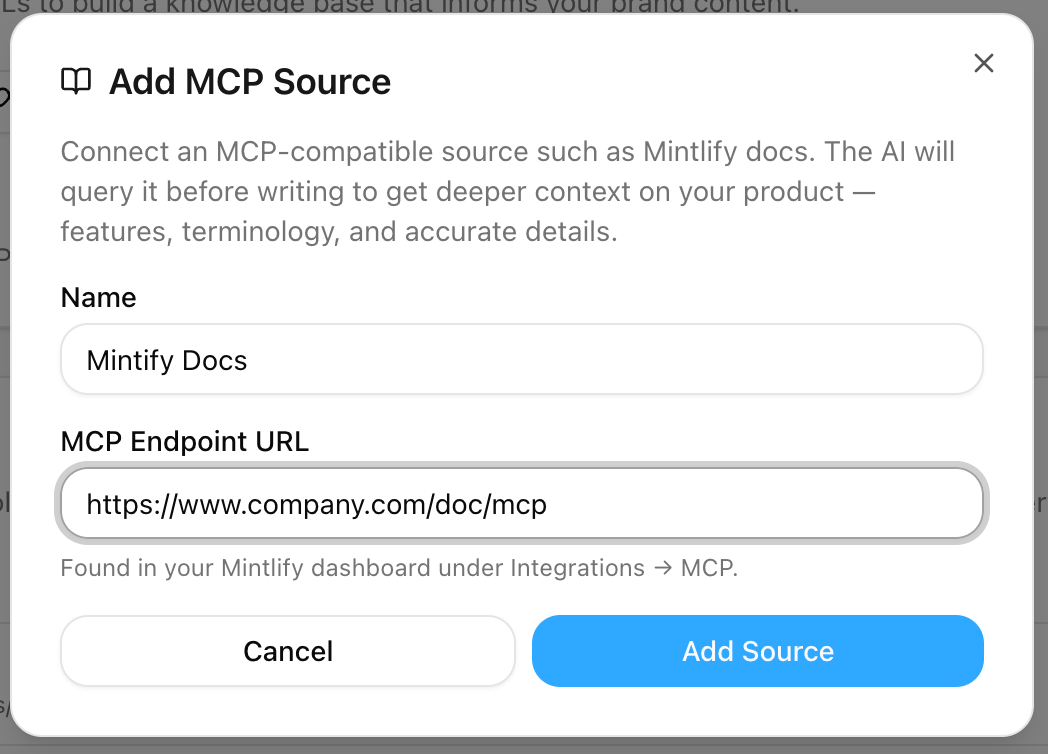 For Mintlify docs, the MCP endpoint is found in your Mintlify dashboard under
**Integrations → MCP**. It's typically your docs URL with `/mcp` appended.
Click **Add Source** to save it. The source now appears in the MCP Sources card and is used as a reference whenever content is created.
## How It Works
When Pierview generates an article, it queries your connected MCP sources during the research phase. Information retrieved from your documentation is **prioritized** when grounding the content, so the AI describes your product accurately rather than relying on general web knowledge alone.
You can connect more than one source, all enabled sources are queried for each piece of content.
To remove a source, click the trash icon next to it in the MCP Sources card.
## Troubleshooting
The endpoint URL must start with `https://`. Double-check the URL is
complete and points to your MCP endpoint (often ending in `/mcp`).
Make sure the MCP server is **public and requires no authentication**,
Pierview queries it without credentials. If the server is auth-gated or
behind a login, queries will fail and the AI will fall back to web research.
For Mintlify docs, the MCP endpoint is found in your Mintlify dashboard under
**Integrations → MCP**. It's typically your docs URL with `/mcp` appended.
Click **Add Source** to save it. The source now appears in the MCP Sources card and is used as a reference whenever content is created.
## How It Works
When Pierview generates an article, it queries your connected MCP sources during the research phase. Information retrieved from your documentation is **prioritized** when grounding the content, so the AI describes your product accurately rather than relying on general web knowledge alone.
You can connect more than one source, all enabled sources are queried for each piece of content.
To remove a source, click the trash icon next to it in the MCP Sources card.
## Troubleshooting
The endpoint URL must start with `https://`. Double-check the URL is
complete and points to your MCP endpoint (often ending in `/mcp`).
Make sure the MCP server is **public and requires no authentication**,
Pierview queries it without credentials. If the server is auth-gated or
behind a login, queries will fail and the AI will fall back to web research.